1. Interface Layout
The interface design of the Automation Editor aims to provide users with an efficient and convenient environment for creating and managing automation tasks. The overall interface is divided into several main areas, including the automation list page, the toolbar at the top of the editing page, the navigation bar on the left, and the main editing area in the middle.
1.1 Automation List Page
The automation control interface mainly consists of the following elements:

- Function Buttons:
- New Automation Button: It is used to create new automation projects.
- Import Button: It is used to import existing automation settings or projects.
- Search Box: Users can enter keywords to search for specific automation projects or settings.
- Drop-down Menu “All”: It may be used to filter or classify and display different types of automation projects.
- Automation Project List:
- There is a switch button next to each automation. The green color indicates on, and the red color indicates off, which is used to control the activation status of the automation project.
- There are also some icon buttons, including edit (pencil icon), modify (gear icon), and delete (trash can icon), which are used to edit automation settings, modify, and delete automation respectively.
1.2 Toolbar
The toolbar is located at the top of the interface and integrates a series of operation buttons commonly used in the process of creating, editing, and publishing automation workflows. According to its functional characteristics, it can be roughly divided into the following categories:

- Project Management Buttons:
- New Button: Clicking this button will start the creation process of a new blank workflow project, providing a starting point for users to build the basic framework of the automation workflow.
- Import Button: When users need to reuse previous project results or introduce external project files, clicking this button will pop up a file selection window, which is convenient for importing corresponding project files.
- Export Button: After the workflow editing is completed, in order to back up the project or use it in other environments, this button can be used to export the project as a file to meet the user’s data storage and migration needs.
- Editing Operation Buttons:
- Copy Button: If users want to copy the currently edited automation content for reuse or modification, they can click this button to complete the copying operation.
- Undo and Redo Buttons: These two buttons are important auxiliary tools in the editing process. The “Undo” button is used to undo the previous operation, and users can use it to roll back in time when they find incorrect operations. The “Redo” button is used to restore the undone operation. If users want to restore the previous operation after undoing it, this button can play a role.
- Activation Button: It is used to activate the currently edited automation.
- Testing and Publishing Buttons:
- Test Workflow Button: During the workflow editing process, clicking this button can test the currently edited automation workflow. By simulating the actual running environment, it checks whether there are errors or exceptions in the workflow to ensure the correctness and stability of its logic.
- Publish Button: After the workflow has been tested multiple times without errors, clicking this button can publish the edited and tested workflow to the actual running environment. At this time, the workflow will officially take effect and start to execute the preset automation tasks.
1.3 Navigation Bar
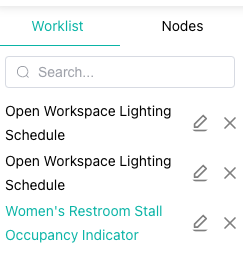
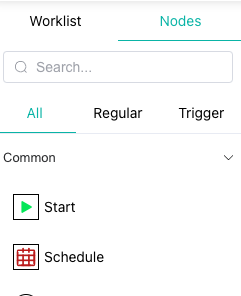
The navigation bar is located on the left side of the interface and is an important interactive area for users to manage projects and nodes in the process of editing automation workflows. It contains two key tabs, “Worklist” and “Nodes”, each of which undertakes different functions:
- Worklist Tab: The main function of the “Worklist” tab is to display the current work list or project list. Through this tab, users can quickly browse all projects and switch between different work projects or tasks.

- Nodes Tab: The “Nodes” tab is used to manage nodes. Nodes represent different steps or functional modules in the automation workflow, and users can add nodes here to provide basic support for building complex automation processes.

2. Searching for Automation
As the number of projects increases, it is extremely crucial to quickly find the required projects. On the interface, there is a “Please input” search box and a drop-down menu (the default selection is “All”) next to the “Import” button.
When searching, users can enter keywords in the search box, such as partial words in the task name. At the same time, select the search scope from the drop-down menu: “All” represents searching for all tasks, “Active” indicates only searching for tasks in the activated state, and “Deactivated” is used to find tasks that have been deactivated. The system will filter and display the matching tasks based on the entered keywords and the selected scope.
For example, if a user only remembers that the project name contains the word “temperature” and only wants to find the currently activated projects, they can enter “temperature” in the search box and select “Active” in the drop-down menu. The system will quickly list the projects that meet the conditions, greatly improving the project search efficiency.

3. New Automation Task (New Automation) Interface
Users can find the “New Project” button at the top of the interface or the “New” button in the toolbar and click it to start the new project creation process. The new automation task interface is presented in the form of a pop-up window with the title “New Automation”, clearly indicating that this window is used to create new automation tasks.
There are two input boxes in the window:


- Name Input Box: It is used to name the new automation task, and this field is required. An accurate and clear name is conducive to users’ identification and management of tasks. For example, “Intelligent Curtain Timing Switch Task”.
- Description Input Box: It is used to describe the automation task in detail. Users can explain the function, purpose, and applicable scenarios of the task here, which is convenient for subsequent maintenance and understanding.
The “Save” button in the lower right corner of the window is used to save the newly created task. After saving, enter the editing interface to set the automation process.

4. Importing Projects
If users already have pre-created project files, they can add them to the editor for viewing and editing through the import function. Next to the “New Project” button at the top of the interface, there is an “Import” button. Clicking this button or the “Import” button in the toolbar will pop up a file selection window. After users select the project file to be imported in the window, the system will automatically add the project to the task list. This function is very practical for team collaborative development or reusing existing project experience. For example, if other members of the team have completed an industrial equipment monitoring automation project, users can import the project file and then make personalized modifications and improvements on this basis, saving the time and effort of creating from scratch.


5. Modifying Automation
To meet the needs of different stages, users can modify the created tasks. There is a modification icon on each automation card. Clicking this icon will take users to the automation modification interface. In the modification interface, users can modify the automation name to make it more accurately reflect the function and purpose of the automation.

The editing automation task interface is presented in the form of a pop-up window with the title “Edit Automation”. Its layout is similar to that of the new task window and also has two input boxes, “Name” and “Description”.
The required identification and length limit of the “Name” input box are consistent with those of the new task interface, which is convenient for users to modify the task name as needed. The “Description” input box is still used to enter detailed description information, enabling users to explain the modified content of the task or the updated function.
There is a “Save” button in the lower right corner of the window, which is used to save the editing and modification of the task. In the actual process of editing tasks, due to changes in business requirements, users often need to modify the task name to fit the new function.

6. Activating Automation
In the automation task list, each automation card is equipped with a circular switch button (On/Off) to control the activation state of the automation. When users click the switch button, the on or off state of the automation will be switched. The green (On) state indicates that the automation is activated, and at this time, the automation will execute the corresponding automation operation according to the preset rules and conditions.

7. Deleting Automation
For automations that are no longer needed, the automation editor provides a deletion function. The trash can icon on each automation card is the entry for the deletion operation. When users click the trash can icon, the system will pop up a confirmation dialog box asking whether to confirm the deletion of the task. After the user confirms, the automation will be completely deleted from the automation list.
